Friday, April 27, 2018

History of Journalism Project Due Today; Return of the Blog

Blog ?: Choose one of the following questions/topics to answer on YOUR blog:

  • What kinds of news stories, topics, or issues are not being covered well by mainstream papers? How does the internet or alternative news sources help address this problem? Give an example.
  • Argue whether or not newspapers are a thing of the past. Are newspaper chains good or bad for journalism (and why or why not?)
  • Do newspapers today play a vigorous role as watchdogs of our powerful institutions? Why or why not? How do newspapers help create and continue our democracy? Is freedom of the press necessary? Why or why not? 

History of Journalism Project Directions (read carefully):
1.Complete this project today. You will need to turn in:
  • An outline
  • Your script (300-500 words, approximately)
  • SEND ME YOUR Document file or URL for: a short film documentary (upload to Youtube), a Prezi, a Padlet, a Google Slide Show, etc. [Make sure you have SHARED or made your work public so we can see it...]
  • A works cited page (in MLA format)
  • A Short personal reflection on the project (100-300 words) (How'd it go? What'd you learn?)
If you finish before the period ends, please: practice your presentation. Read and rehearse your script. Know the material of which you are going to speak. Organize yourself for the presentation and prepare for the presentation!

Finally, if there's still more time, please complete homework assignments (see below). 
  • Please read the chapter handout on Journalism and answer the 6 ?'s for Thursday, May 3.
  • Complete 15 of the 38 questions as a take-home quiz for "10 Days in a Madhouse" (Due Tuesday as a quiz grade)
  • If you did not complete it, please answer the question above on YOUR blog.
HOMEWORK: Complete reading "10 Days in a Madhouse" and answer the take-home quiz (due Tuesday, May 1). Read, annotate, and complete the 6 ?'s in the chapter "Journalism". Be prepared to deliver your presentation on Tuesday, May 1 in class.

Tuesday, April 24, 2018

History of Journalism Project; Day 4

History of Journalism Project Directions (read carefully):
1. At the end of this project you will need to turn in an outline, script, a short film documentary, Powerpoint, Prezi or Padlet presentation (URL or file), a works cited page and a short reflection.
  • Outline
  • Script (300-500 words, approximately)
  • Document file or URL for: a short film documentary (upload to Youtube), a Prezi, a Padlet, a Google Slide Show, etc.
  • Works cited page (in MLA format)
  • Short personal reflection on the project (100-300 words)
2. If you are giving a Prezi, Padlet, or Google Slideshow, you will need to explain and present your project live. Study your script for this purpose and know the material so you can present your work to us like a TedX speech...); If you are making a film, your VOICE OVER should be you reading your "script" with pictures and visuals or main details illustrated in the film. You do not have to 'present' to the class--although we will view and watch your film project.
3. Presentation slides should consist solely of pictures and/or short, short media clips. Keep text to only titles or pictures. The details should be delivered by you, the speaker! 
4. The URL for your project, your outline, works cited page, and reflection go to me (and are due when you give your presentation to the class). When presenting your presentation you may use notecards for your topic, but you should know the information you will cover or explain to the rest of the class. See #2 above. 

By the end of class today, please make sure you have completed the following parts of your project: 
  • Research
  • Outline
  • Script
  • Presentation/Document file (please submit your presentation's URL in the comment section below)
  • Works Cited Page
Next class, please prepare for your presentations and complete a short personal reflection on the project (of 100-300 words). 

HOMEWORK: Complete reading "10 Days in a Madhouse." There will be a test! This story an example of investigative reporting.

Friday, April 20, 2018

History of Print/News Journalism Project: Day 3

Please turn in your answers to "The Rise and Decline of Modern Journalism" (part 1); continue your work on the History of Print/News Journalism project in lab today.

Check the subject sheet for a topic involving the history of Print/News Journalism.
  • Johannes Gutenberg & the technology of the printing press (Alquasia)
  • John Peter Zenger & the New York Weekly Journal (Jenna)
  • Benjamin Franklin & the Saturday Evening Post (Kordae)
  • Penny Presses (Benjamin Day & The Sun; James Gordon Bennett's New York Herald) (Isobel)
  • Joseph Pulitzer, William Randolph Hurst & Yellow Journalism (Jesziah)
  • Nellie Bly & Investigative Reporting (Pahz)
  • The Yellow Kid and the rise and role of Comic Strips (Javant)
  • The invention of Radio & Radio News Broadcasting (Victoria)
  • Adolph Ochs & the New York Times (Akhiyar)
  • History of the Newsreel (Joshua)
  • Tom Wolfe & New Journalism (Kemani)
  • Hunter S. Thompson & Gonzo Journalism (Ja'Miah)
  • Woodward & Bernstein & the Watergate Scandal (Turon)
  • Helen Thomas, Judith Miller, Maureen Dowd: 3 Women print journalists (Raeona)
  • Rolling Stone & Jonathan Katz (Britney)
1. You should begin the project with research. Take notes as is appropriate on your topic. You should use your notes to create your outline. Remember to attribute your sources where appropriate.
2. Make sure to copy your site or internet address/URL's into your notes. You need to be able to cite the sources you use using MLA format. 
3. As we work on this project, coordinate your notes. 
4. Decide how it is to be presented in a Prezi, Google Slides, Padlet, or a Moviemaker documentary. 
5. It's a good idea to OUTLINE your work--you need to include an introduction to the topic (what is it?), explain its relevance (why is this topic important), and how it influenced journalism (how has journalism changed because of this issue?)--that's effectively part 1, part 2, and part 3 of your presentation.
6. Create an outline to make sure you know what you have to cover and what you are covering in the presentation. For help creating an outline, check here.
7. No matter what form the presentation takes (short film, Prezi, Padlet, or slideshow) you should write a short "script" for your presentation (about 300-500 words, approx.)
8. Use the script to rehearse for your presentation or as the voice over for your film documentary. Again, remember to include attribution of your sources!
9. Create your project. It is not due yet, but will be soon. Use your time in the lab to progress on your project.

History of Journalism Project Directions (read carefully):
1. At the end of this project you will need to turn in an outline, script, a short film documentary, Powerpoint, Prezi or Padlet presentation (URL or file), a works cited page and a short reflection.
  • Outline
  • Script (300-500 words, approximately)
  • Document file or URL for: a short film documentary (upload to Youtube), a Prezi, a Padlet, a Google Slide Show, etc.
  • Works cited page (in MLA format)
  • Short personal reflection on the project (100-300 words)
2. If you are giving a Prezi, Padlet, or Google Slideshow, you will need to explain and present your project live. Study your script for this purpose and know the material so you can present your work to us like a TedX speech...); If you are making a film, your VOICE OVER should be you reading your "script" with pictures and visuals or main details illustrated in the film. You do not have to 'present' to the class--although we will view and watch your film project.
3. Presentation slides should consist solely of pictures and/or short, short media clips. Keep text to only titles or pictures. The details should be delivered by you, the speaker! 
4. The URL for your project, your outline, works cited page, and reflection go to me (and are due when you give your presentation to the class). When presenting your presentation you may use notecards for your topic, but you should know the information you will cover or explain to the rest of the class. See #2 above. 

By the end of class today, please make sure you have completed the following parts of your project: 
  • Research
  • Outline
  • Script
HOMEWORK: Continue reading "10 Days in a Madhouse" by NEXT Friday. There will be a test! This story an example of investigative reporting.

Wednesday, April 18, 2018

History of Print/News Journalism Project: Day 2

Attribution:

Attribution
_________________________________________________________________
Attribution is stating who said something. Attribution is essential in all the media, including radio and television. Journalists do it so that your readers or listeners can know who is speaking or where the information in the story comes from. You can use attribution for both spoken and written information, so that you attribute information gathered from interviews, speeches, reports, books, films or even other newspapers, radio or television stations.
How attribution works in speech:
Reported speech
Using and handling quotes should be familiar to you. We often use direct quotes. However, attribution should be used whenever you want your readers or listeners to know where your information comes from. For example, in reported speech the attribution is still part of the sentence, although it is not as distinct as when you use a direct quote. In both of the following sentences, we attribute the words to Ms Mar. In the first, her words are in quotes; in the second they are put into reported speech:
QUOTE:
Ms Mar said: "Students can expect no special treatment if they go on strike."
REPORTED SPEECH:
Ms Mar said that students could expect no special treatment if they went on strike.
Notice how, in the reported speech, we had to change the verb "can" to "could" and the verb "go" to "went". This is because, although quotes must be word-for-word, reported speech is a report of something which was said in the past, so the tenses have to be changed.
The use of the linking word "that" is usually optional in reported speech. It is often left out to reduce the length of the sentence, but should be included whenever it makes the meaning of a sentence clearer. It is often used to separate the verb of attribution from a following verb. Compare the two examples. Notice how including "that" in the second example makes the meaning clearer:
The doctor felt many women worried about their health.
The doctor felt that many women worried about their health.
How often should you use attribution?
The good journalist (or writer) has to strike a balance between the need to make clear attribution of statements and the risk of boring the reader with too many phrases such as "he said".
It helps to change the word "said" occasionally, in attributing both quotes and reported speech. Some useful alternatives are "warned", "suggested", "urged", "asked” and "disclosed". But beware: each of these has a specific meaning. Check that it is the correct one for what your speaker said and the way they said it.
The phrase "according to" can be used in attributing reported speech, but do not use it more than once with any single speaker. Although it is usually a neutral term, not suggesting either belief or disbelief, if you use it too often it can give the impression that you doubt the information the speaker has given.
There are other, more obvious danger words to avoid. Words such as "stated" and "pointed out" both imply that what the speaker said is an undisputed fact. You can, for example, point out that the world is round, but you cannot point out that this cake is delicious, because that is an opinion.
Also avoid the word "claimed", which suggests that you do not believe what is being said. Be especially careful when reporting court cases. Lawyers and the police like to use the word "claimed" to throw doubt on opposition statements. You must not do the same.
The exact balance of attribution depends on the kind of story you are writing or the material you can use. If the statements are reliably factual throughout, you only need to attribute occasionally. If, however, the story is heavy with opinion or unreliable statements, you should attribute at least once every two sentences.
Attributing facts and opinions
One of the greatest dangers facing young journalist is accepting what people say as the truth. Just because someone tells you that something is a fact does not make it so.
There are some things which are universally accepted as true, for example that the world is round, that Tuesday follows Monday, that Fiji is in the Pacific. But there are also things which people want you to believe are true but which are either not provable or are lies. These people may not knowingly tell a lie, but many people are careless with the truth.
Also, situations may change; so that the truth at one moment may be wrong the next. Attribution helps you to overcome some of these problems. Attribution is the act of specifying who said what.
If you attribute the words to the person who said them, you do not have to prove or disprove the truth of their words; you simply report them. Also, people judge what is said by the person who says it. Statements made by people in authority carry more weight than statements made by other people.
Look at the following example. The attribution is the phrase said the vice-chancellor Ms Una Mar:
Striking students who miss exams will be given fail marks, said the vice-chancellor Ms Una Mar.
In this case, you may have very little doubt that this is exactly what will happen. But there is always the chance that Ms Mar will change her mind and give the students a second chance. By attributing the statement to Ms Mar, you protect yourself against this possibility. Thus, if the students do get a second chance, you can say to your critics: "We didn't say it, Ms Mar did."
In any case, your readers will be interested to know what public figures believe to be true. Even if it is later found that Ms Mar was mistaken, it is interesting to know that she once believed she would fail the students. As soon as you find out she has changed her mind, you can carry a news story saying so, recalling the previous story attributed to Ms Mar.
Clear and undisputed facts
In cases where there is undeniable evidence that something is so, you obviously do not have to attribute facts. In the following example, the weather was observable. Who is going to argue?
High winds and torrential rain lashed Port Moresby today, bringing down trees and flooding parts of Waigani Drive.
Neither do you need to attribute if you have witnessed the event yourself, for example while reporting from a court:
The National Court sitting in Kieta has sentenced a man to 12 years imprisonment with hard labour for rape.
The court has found the man guilty of rape. You saw the judge sentence him. You can state it as a fact.
There is another category of stories which appear to be true because of the reliability of the sources. These are statements made by people in authority who are in a position to know, such as the police chief telling you about an arrest or the farm manager talking about his cooperative. In such cases, you might not attribute the facts in the intro, but your readers and listeners will still want to know how reliable your information is. So you must attribute the facts further down the story:
A gang of youths ran riot through Boroko shopping centre yesterday, smashing car windscreens and shop windows.
Police said about 30 youths were involved and all are thought to be from Morata.
or:
The Pago Farm Cooperative plans to double its rice production to 200 tonnes next year.
Manager Mr Irwin Neman revealed the plans yesterday at a ceremony to mark the cooperative's second anniversary.
In both cases, the sources are reliable enough for the intros to stand on their own. Attributing the information has added extra weight to them. Your readers or listeners can judge how reliable the information is.
Opinions
There is no alternative to attribution when statements made are opinions. If you do not attribute an opinion to an individual, your audience will assume that it is your own opinion - and there is no excuse for that kind of confusion in a news story.
Your problem may come in deciding what is a verifiable fact and what is only opinion. In many cases this is easy:
Localisation in the public service has been rapid, but the quality of work is still below expectations, according to Home Affairs Minister Mr Barney Kina.
With a concept as vague as "quality of work", this can only be an opinion, even expressed by a senior minister. You will often find that opinions use vague and unspecific language. (SeeChapter 56: Facts and opinion.)
In cases where fact and opinion are not easily separated, play safe and attribute the story.
Attributing a statement to someone is no defence in a claim for defamation. If you wrongly accuse a person of being a thief, it is no excuse to say that you were just quoting someone else.
Reliable sources
In some cases, your sources of information may not want to be named, for fear of revenge. Journalists who are sure of their facts often attribute such information to "usually reliable sources", "informed sources" or "sources within the department/company".
In some cases, they use phrases like "it is widely believed that" or "it is understood that". Be warned! If your information is wrong, the blame will rest at your door. The greatest danger comes in "off the record" interviews. You must always consult your news editor or chief of staff about what you can and cannot say in such cases. (See Chapter 59: Sources of information.)
TO SUMMARIZE:
  •   
    Quotes are an important tool for print journalists, but they should never be used on radio, and only as text on television.
  •   
    Always attribute quotes to the speaker or source of information.
  •   
    You can use alternative words to "said", but beware that they may have distinct meanings and may imply support or disbelief.
  •   
    Attribute all opinions and information which is not a clear and undisputed fact

Please continue your work on the History of Print/News Journalism project.

Check the subject sheet for a topic involving the history of Print/News Journalism.
  • Johannes Gutenberg & the technology of the printing press (Alquasia)
  • John Peter Zenger & the New York Weekly Journal (Jenna)
  • Benjamin Franklin & the Saturday Evening Post (Kordae)
  • Penny Presses (Benjamin Day & The Sun; James Gordon Bennett's New York Herald) (Isobel)
  • Joseph Pulitzer, William Randolph Hurst & Yellow Journalism (Jesziah)
  • Nellie Bly & Investigative Reporting (Pahz)
  • The Yellow Kid and the rise and role of Comic Strips (Javant)
  • The invention of Radio & Radio News Broadcasting (Victoria)
  • Adolph Ochs & the New York Times (Akhiyar)
  • History of the Newsreel (Joshua)
  • Tom Wolfe & New Journalism (Kemani)
  • Hunter S. Thompson & Gonzo Journalism (Ja'Miah)
  • Woodward & Bernstein & the Watergate Scandal (Turon)
  • Helen Thomas, Judith Miller, Maureen Dowd: 3 Women print journalists (Raeona)
  • Rolling Stone & Jonathan Katz (Britney)
1. You should begin the project with research. Take notes as is appropriate on your topic. You should use your notes to create your outline. Remember to attribute your sources where appropriate.
2. Make sure to copy your site or internet address/URL's into your notes. You need to be able to cite the sources you use using MLA format. 
3. As we work on this project, coordinate your notes. 
4. Decide how it is to be presented in a Prezi, Google Slides, Padlet, or a Moviemaker documentary. 
5. It's a good idea to OUTLINE your work--you need to include an introduction to the topic (what is it?), explain its relevance (why is this topic important), and how it influenced journalism (how has journalism changed because of this issue?)--that's effectively part 1, part 2, and part 3 of your presentation.
6. Create an outline to make sure you know what you have to cover and what you are covering in the presentation. For help creating an outline, check here.
7. No matter what form the presentation takes (short film, Prezi, Padlet, or slideshow) you should write a short "script" for your presentation (about 300-500 words, approx.)
8. Use the script to rehearse for your presentation or as the voice over for your film documentary. Again, remember to include attribution of your sources!
9. Create your project. It is not due yet, but will be soon. Use your time in the lab to progress on your project.

History of Journalism Project Directions (read carefully):
1. At the end of this project you will need to turn in an outline, script, a short film documentary, Powerpoint, Prezi or Padlet presentation (URL or file), a works cited page and a short reflection.

  • Outline
  • Script (300-500 words, approximately)
  • Document file or URL for: a short film documentary (upload to Youtube), a Prezi, a Padlet, a Google Slide Show, etc.
  • Works cited page (in MLA format)
  • Short personal reflection on the project (100-300 words)

2. If you are giving a Prezi, Padlet, or Google Slide show, you will need to explain and present your project live. Study your script for this purpose and know the material so you can present your work to us like a TedX speech...); If you are making a film, your VOICE OVER should be you reading your "script" with pictures and visuals or main details illustrated in the film. You do not have to 'present' to the class--although we will view and watch your film project.
3. Presentation slides should consist solely of pictures and/or short, short media clips. Keep text to only titles or pictures. The details should be delivered by you, the speaker! 
4. The URL for your project, your outline, works cited page, and reflection go to me (and are due when you give your presentation to the class). When presenting your presentation you may use notecards for your topic, but you should know the information you will cover or explain to the rest of the class. See #2 above. 

HOMEWORK: Please read and answer the ?'s on Newspapers for Friday's class. Also, begin reading "10 Days in a Madhouse" by NEXT Friday. There will be a test! This story an example of investigative reporting. More on this assignment next class.

Sunday, April 15, 2018

Photography Series Share Out & Critique; Intro to Print Journalism

Please turn in your photographic series in the first 10-15 minutes of our class today. Remember to SHARE your PREZI, GOOGLE SLIDES, POWERPOINT, etc. and send me the URL in the comment section below. Highlit students have already turned in their work.

Photography Series:
Other students: 
Then:

TASK: Choose 3 other students' work you would like to review. View and critique their work by examining the COMPOSITION of the photography. In other words, look for diagonal lines, horizontal lines, vertical lines, the rule of thirds, subject matter, concept, creativity, etc. Comment (in writing!) which photos work best (and which ones don't add to the theme or concept of the series) and WHY...give reasons for your criticism, please. Turn in your 3 evaluations by end of period 7 today.

Period 8:

Investigative journalism involves researching and reporting a story that someone is trying to hide from the public. Writers often investigate and report information to create change in the world. Investigative reporters are behind many of the changes that we see today in our society due to their reporting the "truth."
  • Choose a topic for your investigative research journalism article/prezi/powerpoint project

Please begin work on the History of Print/News Journalism project.

Sign up on the subject sheet for a topic involving the history of Print/News Journalism.
  • Johannes Gutenberg & the technology of the printing press
  • John Peter Zenger & the New York Weekly Journal
  • Benjamin Franklin & the Saturday Evening Post
  • Penny Presses (Benjamin Day & The Sun; James Gordon Bennett's New York Herald)
  • Joseph Pulitzer, William Randolph Hurst & Yellow Journalism
  • Nellie Bly & Investigative Reporting
  • The Yellow Kid and the rise and role of Comic Strips
  • The invention of Radio & Radio News Broadcasting
  • Adolph Ochs & the New York Times
  • History of the Newsreel 
  • The Invention of Television & News Broadcasting
  • Tom Wolfe & New Journalism
  • Hunter S. Thompson & Gonzo Journalism
  • Woodward & Bernstein & the Watergate Scandal
  • Helen Thomas, Judith Miller, Maureen Dowd: 3 Women print journalists
  • Rolling Stone & Jonathan Katz
1. You should begin the project with research. Take notes as is appropriate on your topic. 
2. Make sure to copy your site or internet address/URL's into your notes. You need to be able to cite the sources you use using MLA format. 
3. As we work on this project, coordinate your notes. Decide how it is to be presented in a Prezi or Powerpoint.
5. Create an outline to make sure you know what you have to cover and what you are covering in the presentation. For help creating an outline, check here.

History of Journalism Project Directions (read carefully):
1. At the end of this project you will need to turn in an outline, a Powerpoint or Prezi presentation (URL or file), a works cited page, and a short reflection.
2. Presentation slides should consist solely of pictures and/or short, short media clips. Keep text to only titles or pictures. The details should be delivered by you, the speaker! 
3. You will need to present your Slideshow, Powerpoint or Prezi to the rest of the class. The outline, works cited page, and reflection go to me (and are due when you give your presentation to the class). When presenting your presentation you may use notecards for your topic, but you should know the information you will cover or explain to the rest of the class. 

HOMEWORK: Please read and answer the ?'s on Newspapers for Friday's class. Also, begin reading "10 Days in a Madhouse" by NEXT Friday. There will be a test! More on this assignment next class.

Thursday, April 12, 2018

Film Photography; Biography Photo Series Project

During the first half of period 7, please complete your film editing. EXPORT your file as an MP4 (for Youtube) and upload to Youtube. In the COMMENT section of this blog post, please send me your group's URL for your film.

If you did not get to TASK TWO from last class, please do so now:

TASK TWO: Biography Photo Series

Take a look at these example Biography Photo Series.
Steps 1-3: You should have completed your homework (see previous post for details). Use the 5 pictures you took. Upload and arrange your photos for class viewing. This could be a Prezi, a Google Presentation, or a Padlet.

Step 4: Give your photo sequence a title.

Step 5: Write a brief 100-300 word explanation of your series. What are you attempting to show and/or comment on through your photography? Most photographic series have a point or comment about society, the subject, or humanity in general. What's your theme or message? Explain it.

When you snap a picture, remember to consider the rule of thirds!

This project should be completed by the end of class today.

If you cannot proceed with your photography project, or you are done, please view the following camera technique videos:
TASK THREE: Otherwise, please take a look at some of the short videos on this webpage. View a few films and look at the documentaries about how to make a film. Choose 2 videos that you watch and ON YOUR BLOG, post a summary of what you learned from watching those tutorial videos.

Period 8ish: It is my hope that we will screen our films (and start screening peers who have completed their photography series).
HOMEWORK: See Task #3 above. Do that if you did not complete it in class.

Tuesday, April 10, 2018

Film Shots Project; Biography Photo Series

Please view this film as a model for what we're about to do.

We are going to practice film making by doing the following project:

  • In your group* (see below) use the cameras available to take example shots. You can use your creativity, but only take 10 minutes (I'll time you) to shoot your camera/angle/shot examples. You do not need a coherent story--just the example shots. Students in your group should share the responsibility of being in the shot or taking the shot.
  • You will then edit these shots together using a film editing program and submit them for our viewing
  • Use Windows Moviemaker (or Premiere) to arrange your shot/angle examples (all students should learn how to use the program. If you are already familiar with how to edit, allow your peers (who don't have as much experience) edit--you should be available to them to help guide them. 
  • In your film, please include a title screen with your group's names
  • Identify and number each shot (Include a TITLE for each shot naming that shot). You can, of course, also announce the shot by your voice over, but it should be clear what the shot is.
  • After you create and edit your film, please upload it to Youtube and send me the link for the film in the COMMENT section below. We will screen these projects next class.
Groups: 

Group A: Kordae, Victoria, Joshua
Extreme close up, close up, medium shot, long shot, extreme long shot

Group B: Akhiyar, Raeona, Javant, Alquasia 
Low angle, oblique (Dutch) angle, High angle, pan, tilt

Group C: Kemani, Isobel, Turon, Jesziah
Tracking shot, deep focus shot, cut, dissolve, fade out

Group D: Jenna, Pahz, Ja'Miah, Britney
Establishing shot, shot/reverse shot, eyeline match, wipe, zoom

While you are waiting for a camera to shoot your "film" footage, please work on the following:

NOTE the following information. Learn it. Use it for the next project.


The Rules of Photographic Composition


Take Better Photos With Your Digital Camera:

Follow the Rule of Thirds

Most people are at least somewhat familiar with the rule of thirds. The rule of thirds is utterly ubiquitous: Every movie and TV show makes almost constant use of it, and professional photographers avoid putting the subject in the center of the frame almost without exception. To understand it, draw two lines through a photo, dividing it into thirds. This turns it into something like a tic-tac-toe board, as you see here.
At its essence, the rule of thirds says that you'll get the most interesting photos when your subject isn't in the center of the frame, but rather is positioned off-center, to the left, right, up, or down. You can position your subject at any of the four intersection points of the third lines, or along one of the four lines, like the birds in this example.


Use Diagonals to Your Advantage

Here's another trick using lines: If you want to add a sense of drama to your photograph, look for ways to incorporate a diagonal. Draw a mental line from one corner of the scene to the other; if you can find some element in the situation that more or less follows this line, it can make your shot more dynamic and add some energy to the scene, almost as if it's pulling the viewer through the scene. The diagonal can run the entire length of the photo, as it does in this photo.
But it's not critical for your diagonal to span the entire photo. You can get essentially the same effect even with a partial diagonal, such as this.


Break the Monotony

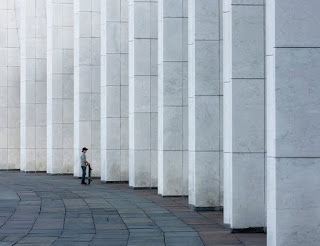
This is a fun one. No doubt you've seen photos in which most of the frame is filled with more or less the same thing: a field of grass, a pile of pennies, rocks, fish, stars in the night sky. Such photos truly would be monotonous if that's all they offered, but often, the photographer will incorporate one out-of-place element that attracts your eye like a magnet. With that in mind, this rule says that you should look for photos that are mostly uniform and then break the pattern with an element that disturbs the natural flow or organization of the scene.


Make it Symmetric (and Then Disturb Your Symmetry)

Rules, of course, are meant to be broken. The rule of symmetry is all about capturing the natural symmetry in nature. There are a few ways to do this. You might shoot a scene in which both sides of your photo are essentially the same, for example. Or you might shoot a photo of something that is itself quite symmetrical, like a flower.
Even better, though, is when you incorporate a lesson from the rule about monotonous content and shake things up with a little variation. Surprise the viewer, either by making one side of the photo non-symmetrical, or, in this example, defeat the symmetry of the flower by shooting only part of it in the frame.


Position Movement Into the Frame

One of my favorite photo subjects is motion. I like capturing the essence of speed and energy in what's by its very definition a static art form. But how you introduce that motion into your photo is really important. Whether you're shooting a speeding car, an airplane, a flock of birds, or a running dog, be sure that the motion leads into the frame, not out of it. By that, I mean you should give the leading edge of your moving subject plenty of room; it should be positioned on a third line (see the rule of thirds) and pointed at the center of the frame, not at the closest edge, as you see in this shot. 

HORIZON LINES
A good technique for landscape shots is to position horizons or building (objects) along one of the horizontal lines.

Dividing a composition in half by placing the horizon across the middle of the frame can create a powerful composition with the right subject and appropriate light. See below.


Horizons placed very low in the frame heighten the isolation of subjects at the horizon.


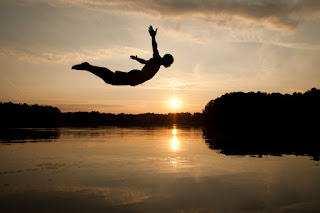
Isolating one person at the bottom (or top) edge of the frame can create an atmosphere of emptiness by contrasting it with the vastness of the sky, or to suggest ascension or flight.


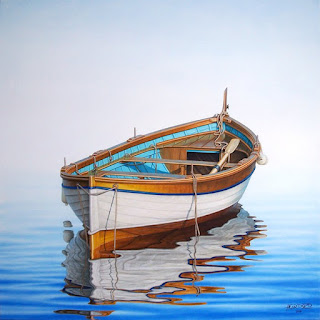
You can also apply the rule of thirds guidelines to the placement of the horizon in your photos. Here the center position of the boat and horizon results in a static feeling. We've moved the horizon line to the lower third. In general, place the horizon high or low in your scenes, but rarely in the middle. Centered shots may suggest order or symmetrical balance. Taking a shot head on is also awkward. Avoid this kind of shot when making documentaries. The position of the subject shot off-center, suggests conflict. 


For more examples and advice, check out this link!

TASK TWO: Biography Photo Series

Take a look at these example Biography Photo Series.

Step 1: Choose a subject for a photo series. This should be someone you can follow around or someone who you have some normal contact with. It can be a friend, a relative, a community member, or even yourself (selfies!), etc.

Step 2: With your cell phone or a camera, shoot 5 photos that you will arrange to communicate some artistic message to the world. See and use the Photo Analysis assignment notes above for assistance.

Step 3: Arrange your photos for class viewing. This could be a Prezi, a Google Presentation, or a Padlet.

Step 4: Give your photo sequence a title.

Step 5: Write a brief 100-300 word explanation of your series. What are you attempting to show and/or comment on through your photography? Most photographic series have a point or comment about society, the subject, or humanity in general. What's your theme or message? Explain it.

When you snap a picture, remember to consider the rule of thirds!

This project is NOT due yet, (see homework)


If you cannot proceed with your photography project, or you are done with your film project and are fooling around, instead, please view the following camera technique videos:
HOMEWORK: Please shoot 5 photos (or select 5 photos from the thousands you might have taken for this project). Use what you have learned in film as well as the advice about taking better photos from today's lesson.

Bring your photos/files to Thursday's class. You will have time in the lab to arrange and prepare your biography photo series.

If you did not view the linked videos, please watch them and learn how to be a better cinematographer.

Game Review Article; Ready Player One

  Please write a review of the Atari 2600, NES or Sega game you played. Your article should include the following: 1. A researched historic...